Showing posts with label DIY projects. Show all posts

Friday, September 10, 2010

Stretching Shoes

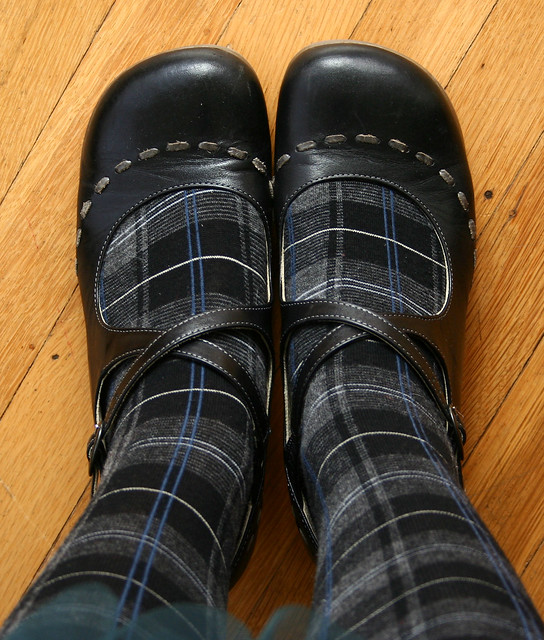
At last I got to wear my adorable new All Saints oxfords, which languished in my closet for several months while I tried to decide whether to stretch them or send them back. Obviously I decided to stretch them, and although they could still use a little more work, they're already vastly more wearable than they were at first.

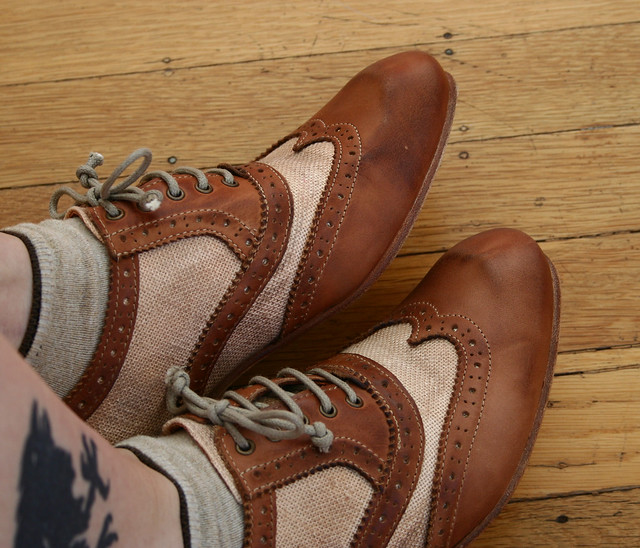
The problem with these shoes was the width, which I increased using FootFitter Pro stretchers and stretching spray. From the reviews I read on several of the different models of shoe stretchers, I deduced that the issue with the plastic-threaded ones is that they can strip when you tighten them. However, the models with metal threads are more than twice as expensive, and I wanted to be able to buy two so that I could stretch both shoes at once (I'm not exactly known for my patience). So I went with the plastic-threaded model and proceeded with caution, at first turning the width adjustment until it was just tight, and increasing the tension about 3/4 of a turn per day, preceded by a thorough soaking with the stretching spray.

In the end it took me about a week to complete the stretching, using the spray, tighten, wait overnight, and repeat technique. It worked so well that I've already got several other pairs in mind for some size adjustment. Considering that it costs around $12 per pair to have shoes stretched professionally, it will take less than 3 pairs for these stretchers to totally pay for themselves. And if I end up with shoes that are more comfortable, the cost really becomes negligible.

All in all I'd highly recommend getting your own set of shoe stretchers if you're like me and struggle with the comfort of your shoes, and also if you have several pairs that need length and/or width adjustment. Not only can you make initial adjustments to new shoes, but you can go back and readjust older shoes that may have become tighter during months of not being worn (this is a particular concern for people who live in areas of temperature extremes, where you have entire seasons where certain shoes cannot be worn). Note that the stretchers I've discussed here do not work on boots; boots require a special kind of stretcher that is typically a lot more expensive. If anyone has a model of boot stretcher they can recommend, I'd love to hear about it.  

Cardigan, shoes: All Saints
Shirt: Tulle
Belt: Lazaro
Shorts: White House Black Market

Tuesday, August 24, 2010

Hemmed In

This is the last you're going to see of this hair color for awhile; at the end of the day I when wore this outfit I emailed my group saying that I was leaving early and was, "off to do something radical to my hair." You'll see just how 'radical' I got tomorrow.

This dress was another hemming project that I completed last weekend. As much as I love this dress I was never quite happy with the length, and I wanted the option to layer it and add some contrast at the hem. Over the weekend I had a couple of other mending projects, which got me inspired to dig through my wardrobe and see if there was anything I could spruce up with some simple alterations. The skirt I posted yesterday was one, and this dress was another. If you look closely you can see that I hemmed the dress using a contrasting thread (navy blue) in a heavy, decorative stitch. This made the hem look a little more interesting, with the added benefit that the heavy stitch hid any little mistakes in the sewing. Keeping a perfectly straight sewn line, especially on a stretchy fabric like this one, is not one of my strengths.

Dress, belt: Red Dress Shoppe 
Tulle skirt: Noa Noa
Shoes: John Fluevog


Friday, June 25, 2010

Double Down on Adorable

Halloo, friends! I haven’t forgotten about you – and hope you’ve not forgotten about me! Thanks to Audi – who’s so very patient with me (and a genius with the camera), I have bunches of outfit photos and ideas to come. Plans to post more frequently now and again are in the works, but let’s step into the [not so] way-back machine for a moment:

My very good friend, Miss Amanda Willis, and I spent a fantastic April weekend in Las Vegas – for Viva Las Vegas: 4 amazing days filled with 50s silhouettes, burlesque shows, classic cars, rockabilly betties, and pompadour-ed paramours.

I’m telling you guys – the hair and outfits were AMAZING. I’d checked out the photo gallery before I left, and decided I needed to step up my game. Apparently, this translated (in my head), into making a dress.

My seamstress skills are rudimentary at best (though improving!), and having no actual pattern, I used this cotton swing dress from pinupgirlclothing as a basis:

Yes, that photo was taken in a bathroom. What? It's KLASSY!!

Several yards of brown paper, a small pile of sidewalk chalk, and many miscalculations later, I wound up with this:


Something I like best about the 50s look – hourglass is queen. The silhouette is particularly flattering for those of us with a …[ahem]… generous bosom. A style that accents my waist, making the most out of those assets is one I can fully embrace. Plus, optional bonus: floofy petticoats! You know how we love to layer.

One of my favourite online shops, Stop Staring, had a booth at the convention – neither Amanda nor I could resist the unique opportunity to try on garments in person – or their VLV-bargain prices, and I scored a couple super hott wiggle dresses which may make their appearance on the blog at some point.

Let me tell you, these ladies know curves.


White sweater: borrowed
Dress: made by Jess
Silver heels: ? TJMaxx long long ago
Parasol: 5 bux at the car show (it was HOT out there)
Apologies for the fuzzy photos – my camera (and photoshop) skills are due for a tune-up – also, some guy at the car show helped out by cutting off our feet.

xo
Jess

Tuesday, August 11, 2009

The Final Countdown

You can tell I was feeling more than a little cheeky when I took the photos for this outfit. The reason? I was listening to a whole playlist of 80's music, and when I was shooting this one it was "The Final Countdown." I'm not exactly sure why a hair-band rock anthem made me want to strike such saucy poses; perhaps it was because I was remembering the time I drunkenly karaoke'd that song in Tokyo at the insistence of my friends. For the record, my vocal range is nowhere near high enough to sing that song; nevertheless I belted it out and even jumped up on the table to sing it while pumping the air with one raised fist. I blame jetlag.

Ahem. Let me tell you about the outfit, shall I? This top is really tricky to work with because the color is exceptionally bright, and I have absolutely nothing else in my closet that is even close to this shade. I wanted to avoid pairing it with black because I feared it would make the green look garish, so I went with a navy backdrop instead. The green actually has quite a bit of blue in it, so the combination makes sense. Since I didn't want to bring in an entirely different third color, I mixed up the outfit a little by blending different shades of blue.

The sweater clip is one I made ages and ages ago, but until now I hadn't found a use for it. With this outfit it was an absolute necessity; the flower detail on the top prevents the cardigan from being buttoned, but I really needed the cardigan to stay closed so as to hide the incredible tackiness of my bra straps hanging out. Have I mentioned that I abhor strapless bras? The reason is that I don't have a whole lot to hold them up, so I find myself having to hike them up several times a day; as a result I often seek out creative ways to wear regular bras even with strapless or halter-style tops.

By the way, if you'd like to make a cardigan clip of your own, this excellent post from Kasmira will show you how it's done.

Cardigan: H&M
Top: Red Dress Shoppe
Skirt: Moon Collection
Shoes: Paolo

Friday, August 7, 2009

Dye Another Day

Remember this dress from several months ago? Back then it was a drab oatmeal color and a size too big. Since then I've had it altered to fit me and dyed it a fun shade of green, and I'm pretty pleased with the results. It has much more of a mod trenchcoat feel to it now, which I tried to play up here by adding the vintage 60's shirt.

The dyeing process was a lot of work, but well worth it for the excellent results. The dye I used was a fiber reactive dye from the Dharma Trading Company. The dye only works on natural fibers, so it colored the linen fabric beautifully while leaving the off-white topstitching, plastic buttons, and nylon lining intact (as a bonus, it didn't stain the sink either). This gives it a very professional appearance; in fact, you'd be hard pressed to discern that it wasn't made this way originally. Click the picture at left if you want a close up of my handiwork -- the pop-up photos are all zoom-able too.

Before I started this project I knew literally nothing about dyeing clothes. For instance, I was completely ignorant of the fact that there were several other supplies I needed besides just the dye (shame on me for not reading the directions before I ordered the dye!). Thus, I ended up having to place 2 orders, one for the dye and one for the soda ash, Calsolene oil, and a few other things. However, now I've got all the stuff I need to do lots more dyeing, so with the exception of different colors I'm all set for whatever other projects I want to try. I'm thinking this will be a great way to transform pieces that either are a light color and getting dingy, or that I'm just tired of. Just as a simple coat of paint can completely transform a room, a different color can make old clothing new again.

Shirt, dress: thrifted
Boots: Bata
Brooch: vintage Trifari